Feeds:
Posts
Comments

Hey folks! First let me just say HAPPY NEW YEAR!!!!! I’ve missed you! So glad 2012 is done with and hopefully bigger and better things start happening in 2013. Where have I’ve been? you ask…well I took a break…my life became a lot crazier with all these cakes I’ve been baking and flowers I’ve been making (ha…just rhymed).

DSCN2917


DSCN2938


DSCN3293


Oh! and my kids (who are growing like weeds)…oh and my husband (who wants to remain a mystery)…I’ve been taking care of them too!

28840_4808289934483_1105868654_n


No worries though I do plan on blogging more this year…(its ok to clap and smile)…I’ve gotten back into my cooking groove…so I have lots of yummy  recipes to share. Really appreciate those who haven’t given up on my yet, just waiting for me to get my act together!

Well I’ve got it together…so look out for a post in the next few days! I must go now my two year old just woke up from his nap and he’s feeling good…need to make sure he hasn’t gotten hold of a sharpie pen…bye!


This is something I do a few times a year and it saves us a couple trips and some money to Starbucks. Try it…its so worth it!

Black Martha

Coffee in general is not cheap. I’m sure many of you have gone to your favorite coffee joint and have spent $4 or more dollars on a nasty cup of so-called-coffee and it really ruined your day. I know I have…especially on iced coffee…and I’m not a nice person when folks don’t get my drink right (especially Dunken Doughnuts)!

So you could only imagine how happy I was when one of my favorite bloggers wrote a post on how to make iced coffee concentrate. Not a lot of ingredients or fancy tools are needed. Just some really good strong ground coffee, cold water, large bowl and some patients ( you have to let it sit for a while).

Hours later…you have this glorious drink…and it taste good…really good.

Surprisingly…it doesn’t get watered down, has a smooth taste down to the last sip and doesn’t send your tummy into gurgle mode…

View original post 261 more words

Hello good people…Black Martha has not fallen off the face of the earth! Its been real busy lately. But glad to have a moment to share a wonderful recipe for baked Mac n’ Cheese.

After you make this you won’t go back to the  box crap with powdered cheese. I’m serious, its that good…real good…hug your momma good. My oldest child who is not a fan of cheese loves this stuff and that says a lot.

Baked Mac n’ Cheese
adapted from Pioneer Woman

1lb box Dried Macaroni
1 whole Egg Beaten
1/4 cup (1/2 Stick Or 4 Tablespoons) Butter
1/4 cup All-purpose Flour
2-1/2 cups Whole Milk
2 teaspoons Dry Mustard
1 pound Cheese, Grated or 2 bags of shredded cheddar cheese
1/2 teaspoon Salt, More To Taste
1/2 teaspoon Seasoned Salt, More To Taste
1/2 teaspoon Ground Black Pepper
1/2 teaspoon Paprika

Preheat oven to 350’F.

Cook macaroni until very firm. Macaroni should be too firm to eat right out of the pot. Drain. I cooked mine for 5-6 minutes.

In a small bowl, beat egg, set aside.

In a large pot, melt butter and sprinkle in flour. Whisk together over medium-low heat. Cook mixture for five minutes, whisking constantly. Don’t get lazy and stop whisking…it will burn.

Pour in milk, add mustard, and whisk until smooth. Cook for five minutes on medium-high until very thick. Reduce heat to low.

Take 1/4 cup of the sauce and slowly pour it into beaten egg, whisking like crazy to avoid cooking the egg. Whisk together till smooth.

Pour egg mixture into sauce, whisking constantly. Stir until smooth.

Add in two cups of cheese and stir to melt.

Add salt, season salt, pepper and paprika. Taste sauce and add more salt and seasoned salt as needed.

Pour in drained, cooked macaroni and stir to combine.
Serve immediately (very creamy) or pour into a buttered baking dish, top with extra cheese, and bake for 20 to 25 minutes or until bubbly and golden on top.

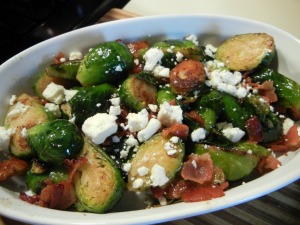
My husband brought home a very large bag of Brussels Sprouts in hopes that we can start incorporating some fresh veggies into our diet. I’ve never tried these little cabbages, but was not eager one bit to cook them, since they have the tendency to make your house smell like some boo-boo (that’s saying it nicely).

So the other day, I asked some of my peeps to give me some suggestions as to how to cook these things. Seemed like roasting or sauteing them was the best way to go. I chose to saute them.

The recipe I used called for bacon, which I’m all for some bacon. Bacon makes anything taste better. I went ahead and made a small amount not knowing how these would turn out.

Well…they turned out really good. I would make these again. My kids weren’t crazy about them…but it might have been to much for their little palettes. The only thing I didn’t like was the smell…it lingered in my house for two days.

Brussels Sprouts
recipe adapted from Paula Deen
thanks for sharing this Antoinette!

Serves 4

Ingredients
• 2 tablespoons butter
• 6 whole garlic cloves
• 4 to 6 slices bacon
• 3/4 pound (about 12) Brussels sprouts, cut in 1/2
• 1 teaspoon sugar
• 1/2 cup chicken broth
• Salt and freshly ground black pepper
• Feta or Blue Cheese

Directions

In a large skillet melt the butter over medium heat. Put the garlic cloves in the skillet and brown completely. Remove the garlic to a small bowl. Add the bacon to the skillet and cook until crisp. Transfer the bacon to paper towels to drain, then cut into small pieces and set aside.

Put the sprouts in the skillet with bacon grease, flat side down, and saute’ until they begin to brown, about 2 to 3 minutes. Turn them over, increase the heat to medium-high and add the sugar and the broth. Cook for a few minutes, then add the cooked bacon and the garlic cloves. Cover and cook for 2 more minutes.

Transfer Brussels Sprouts to a serving bowl, sprinkle with Feta or Blue cheese and serve.

Not to long ago I went out with some friends to celebrate my birthday and we went to a great tapas restaurant in Old Town Alexandria, VA called La Tasca. They have great sangria, good food and some BOMB empanadas.

Ever since I went there and enjoyed some fried beef empanadas, that’s all I’ve been craving for the last couple weeks.
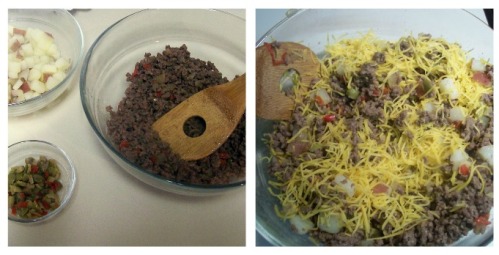
So I made some. Instead of frying them…I baked them…and they were tasty…not La Tasca tasty…but good enough to make again.

The only thing I didn’t do was take enough step by step pictures. So I apologize…but they are so easy to make and you can add pretty much whatever you want to these things.

…and yes you can fry them…if you are not concerned about your waistline (frying instructions are at the bottom).

Baked Beef Empanadas
slightly adapted from Smitten Kitchen
makes about 12

3/4-1 pound of ground beef chuck
1/2 medium onion finely chopped
1 tablespoon olive oil
1 garlic clove, finely chopped
1 teaspoon ground cumin
3/4 teaspoon dried oregano
Salt and pepper to taste or use some season salt
1 1/2 tablespoons chopped pimiento-stuffed olives (optional)
1 1/2 cups of shredded cheddar cheese
1 package frozen empanada pastry disks, thawed

1 egg beaten with 2 teaspoons water

Preheat oven to 400’F degrees. Line a baking sheet with parchment paper or Silpat silicone mat.

Over medium heat, cook onion in olive oil in a heavy medium skillet , stirring frequently, until softened. Add garlic, cumin and oregano and cook, stirring, 1 minute. Stir in beef and cook, breaking up lumps with a fork, until no longer pink, about 4 minutes. Add the olives, cheddar cheese, 1/2 teaspoon salt, and 1/4 teaspoon pepper and stir for a few minutes until well combined. Turn off heat and set aside.

Lay a large sheet of plastic wrap on a dampened work surface (to help keep plastic in place), then take out an empanada disk one at a time,  lay it on the plastic wrap. Place 3 tablespoons meat mixture on disk. Moisten edges of disk with water and fold over to form a semicircle, then crimp with a fork and place on baking sheet. Repeat the same method until you have no more empanda disks.

Lightly brush empanadas with some of egg wash and bake in upper and lower thirds of oven, switching position of sheets halfway through baking, until golden, about 25 minutes. Transfer empanadas to a rack to cool at least 5 minutes.

If you want to fry them….

Preheat oven toe 200’F degrees.

Heat 4 cups of vegetable oil in a deep 12-inch skillet over medium heat until it registers 360°F on thermometer. Fry empanadas, 2 or 3 at a time, turning once, until crisp and golden, 4 to 6 minutes per batch.

Transfer to a shallow baking pan and keep warm in oven. Return oil to 360°F between batches.

Enjoy!


Great Chocolate Frosting

Sorry I haven’t been around lately…I’ve been busy making cakes and putting smiles on other peoples faces.


But no fear Black Martha will not disappear (that sounded really dorky)…I do have a quick frosting recipe to share. This is for those of you who still use canned frosting…SHAME ON YOU!!!!!!

Its a very easy recipe to make. This frosting goes great with yellow cake…and yes you can use a box cake mix (I cringed when I typed that)…whatever you fancy.

It is a little on the sweet side, but I believe chocolate lovers will appreciate the goodness.

Chocolate Frosting
adapted from Sing for your Supper

Makes about 3 1/2

3/4 cup (1 1/2 sticks) butter, melted
1 cup cocoa powder (I used Hershey Cocoa Powder)
5 1/2 cups powdered sugar
*1/2 cup milk
1 1/2 teaspoons vanilla extract

* I haven’t tried this with heavy cream, but I’m sure it would make your frosting super velvety and that much more great!

You can make this in an electric stand mixer or hand mixer.

Stir melted butter into cocoa and alternately add powdered sugar and milk, beating to spreading consistency. Add a small amount of additional milk, if needed. Stir in vanilla. Mix until well combined.

Frost cake when completely cooled, as desired.

I love pork chops, but there is only so much I can make with them. Most of the time I just fry them or I use my one slow cooker recipe for pork chops when I’m feeling lazy, so you could imagine how happy I was to come across another recipe that seemed good enough to try.

I started grubbin’ on this and realized half way through my meal that I didn’t take a photo yet. As you can see I was really feeling this…

This is a really great recipe. It takes no time to cook in the slow cooker and the results are fabulous or as my husband said “this is on point!”. The pork chops come out so moist, the gravy has a great flavor and my family really enjoyed it.

Creamy Slow Cooker Pork Chops
adapted from Ninali
Serves 4-5

1/2 cup flour
1/2 teaspoon Garlic Powder
1/4 teaspoon salt
1/4 teaspoon Pepper
Some season salt (Lawry’s Season Salt is what happening right now)
4-5 whole boneless Pork Chops, about a half to three quarters thick
2 tablespoons vegetable or olive oil
2 (10 ounce) cans Cream of Mushrooms
1 (10 ounce) can Cream of Chicken
1 (14 ounce) can Beef Broth
1 package Onion Soup Mix, 1 ounce packet
4 -5 cups of cooked rice

Rinse pork chops and pat dry with a paper towel. Sprinkle each pork chop with a little season salt on both sides. Combine flour, garlic powder, salt and pepper together in a shallow dish. Generously flour each pork chop with flour mixture and set aside.

Over medium heat, heat oil and add butter in a frying pan until hot, but not smoking. Brown each pork chop (2-3 at a time) until golden brown on each side, about 3-4 minutes on each side. Set pork chops aside.

Pour the cans of cream of mushroom soup, cream of chicken and beef broth in your slow cooker. Mix in the envelope of onion soup mix until well combined. Submerge pork chops in the sauce mixture and cook on high for 3.5 to 4.5 hours until chops are fork tender.

In the meantime prepare your rice. Once chops are done, serve over rice with gravy from slow cooker. These are also great with some mashed potatoes and some veggies…oh! and a dinner roll to soak up some of that gravy.

Enjoy!

Caramel Sauce

Happy New Year! To start this year on a good note I decided to try something that I’ve been wanting to make for some time now…and that’s Caramel Sauce. I’ve had this fear of boiling sugar and somehow knocking the pot off the stove and burning the shiz out of myself ( I’m crazy….I know), but no worries it hasn’t happened…well not yet.

*Sorry for the crappy pics…I took them with my phone…couldn’t get my camera, until I was done making this.


Caramel sauce is very easy to make, just takes some patience and standing in front of the stove for a bit. If you walk away, you risk burning your sugar and the sauce will be ruined….ruined I tell you…cause I did that!! There’s nothing sweet about the smell of burnt sugar in your house.

This sauce is pretty amazing…not life changing…but sooo good. If its done right, you will not go back to store bought caramel sauce…ever…pinky swear! So give it try, it took me three times to get it right.

*The key to getting great caramel sauce it dissolving the sugar before bringing to a full boil. Do this and you will be a very happy person.

Caramel Sauce
adapted from Mels Kitchen Cafe

Ingredients:
1/4 cup water
1 cup sugar
1/2 cup (1 stick) butter, cut into 8 pieces
1/2 cup heavy cream
1 teaspoon vanilla
pinch of salt

Make:

In a small, heavy saucepan, combine the sugar and water. Set the pan over med- low heat and stir the mixture gently until the sugar is dissolved. The syrup will not be completely clear  but  let it warm over medium-low heat (a 3 on my stovetop) for at least 6-10 minutes (I set my timer for 8-10 min) before moving to the next step. To be sure the sugar is dissolved.

A good way to tell is by dipping a spoon in the sugar mixture and then gently slide your finger (it might be hot, so use caution) over the mixture on the spoon and take a taste. If the sugar is dissolved, the syrup will be smooth and not at all grainy. If you still feel grains of sugar, keep stirring over low heat until it is completely dissolved. Make sure the sugar is completely dissolved before letting the mixture come to a boil.

Once the sugar is completely dissolved, increase the heat to medium or medium-high and bring the syrup to a boil. Cover the saucepan and let the syrup boil for 2 minutes.

Uncover, reduce the heat to medium, and continue to boil the syrup until the edges start to turn golden brown. Carefully and gently stir the syrup until it turns a medium amber, caramel color. This can take up to 5-7 minutes. But watch it, cause when it starts to turn gold, it will get dark pretty quickly. I like to take the pot off the stove a few times and swirl the caramel around then place it over the heat as it starts to darken. I do this until its a deep gold color.

Remove from the heat and add the butter. Gently stir until the butter is incorporated. Stir in the cream. If the sauce becomes lumpy and isn’t whisking together, set the pan over low heat and stir until smooth. Stir in the vanilla and salt.

Serve the sauce warm or at room temperature. Store the sauce in a jar or airtight container, tightly sealed, in the refrigerator for up to 1 month. Reheat on 50% power in the microwave or in a saucepan, adding a tablespoon of two or water, if needed, if the sauce is too thick.

Holiday Punch

Happy Holiday’s Everyone! Hope you are enjoying them as much as I am.

If not this drink might make you a little more Merry! Enjoy

Holiday Punch
adapted from What Katie Ate

1 cup cloudy apple juice (use organic or regular is fine)
1 cup cranberry juice
50 ml Vodka (1 travel size bottle)
1 cup ginger ale
Ice

Place apple juice, cranberry juice and Vodka in a jug of a blender. Whiz until light pink and frothy. Pour mixture into a medium size jug. Top with ginger ale and a handful of ice.

Serves 4

Coca Cola Cake

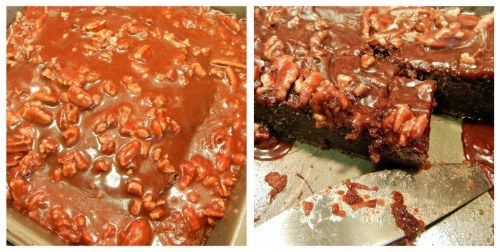
Coke in a cake? That can’t be right? Who came up with this? These are the questions I asked myself when I came across this recipe. Being a lover of Coke I had to try it. A cake that had two of my favorite things in it, chocolate and soda I can’t live without…this had to be good.

This is a very easy recipe. You don’t need a mixer and it takes no time to make. The cake comes out so moist, its ridiculous.

The only issue is its SWEET …SUPER SWEET. You need a glass of milk …kind of sweet.

I have no plans on making this again any time soon. This might be a once a year kind of cake. But it is a great cake to take to a party.

Coca Cola Cake
adapted from May Flaum

Ingredients
1 cup flour
1 cup sugar
1/4 tsp salt
1/2 tsp baking powder
1/4 tsp cinnamon
1/2 cup unsalted butter (1 stick)
2 tablespoons unsweetened cocoa powder
1/2 cup coca-cola (from bottle is my preference!)
1/4 cup buttermilk
1 eggs
1/2 tsp vanilla extract

Glaze
1/4 cup unsalted butter (half a stick)
2 tablespoons unsweetened cocoa powder
1/4 cup coca cola
2 cups confectioners’(powdered) sugar
1/2 cup chopped pecans (optional)

Preheat oven to 35o’F and spray non-stick spray into a 8×8 pan.

In a medium bowl whisk together flour, sugar, baking powder, salt and cinnamon. Set aside.

In a medium or large sauce pan over medium-high heat, combine butter, cocoa powder, coca cola and buttermilk. Stir the mixture really well and bring to a boil.

Remove mixture from heat and add the flour mixture and whisk until combined. Then whisk in the egg and vanilla extract.

Pour mixture into 8×8 pan and bake for 30 – 35 minutes. Your cake will look like its not done, but don’t over bake it.

When the cake is nearly done. Make the glaze.

In a small sauce pan over medium-high heat, mix together butter, cocoa powder and coke. Bring to a boil, then remove from heat.

Slowly stir in the 2 cups of confectioners’ sugar until smooth. Then stir in the chopped pecans if using.

Once cake is done and out of oven (toothpick should come out clean), pour the warm glaze right over the top of the hot cake.

Waite about 10-15 minutes before cutting into it.

Enjoy the sugar bomb!